
- Why are there bright spots on your Samsung TV?
- Understanding the Reason Behind Bright Spots on Samsung TV
- Step-by-Step Guide: Removing Bright Spots on Your Samsung TV
- Safety Measures:
- Step 1: Gather the Required Items
- Step 2: Unplug Your TV
- Step 3: Unscrew and Remove the Screws
- Step 4: Remove the Back Cover
- Step 5: Flip Your TV
- Step 6: Remove Your TV Screen
- Step 7: Lift the Diffuser Panel
- Step 8: Reglue the Reflectors
- Step 9: Reassemble the TV
- Step 10: Return the Screen and Cover
- Step 11: Test Your TV Screen
- Conclusion
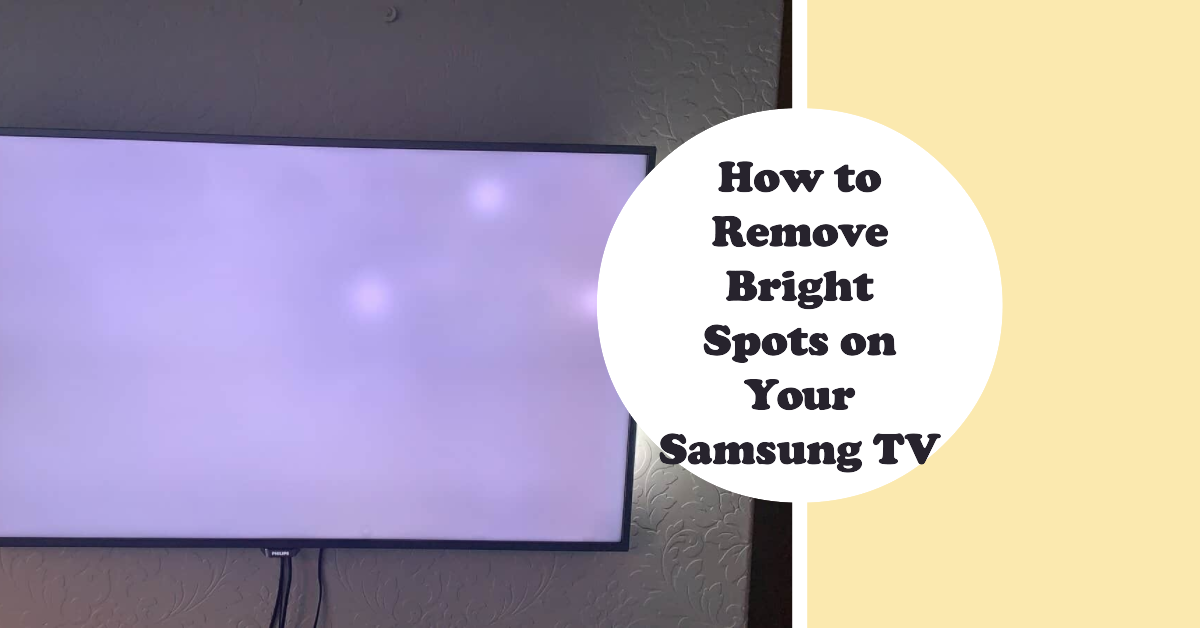
If you’ve been experiencing the annoyance of bright spots on your TV screen, you’re not alone. Many Samsung users face this issue, especially as their TVs age.
But don’t worry, we’re here to help you get rid of these annoying spots and restore the visual quality of your TV.
In this article, we’ll look at the causes of bright spots on your Samsung TV and walk you through the steps to fix them.
By following our guide carefully, you can repair the reflectors inside your TV and eliminate those bothersome bright spots.
Why are there bright spots on your Samsung TV?
If you’ve noticed white spots on your Samsung TV screen, stuck pixels are typically to blame.
However, it’s important to note that there can also be dead pixels that cause black spots instead of white spots on the screen. Contrary to popular belief, these white spots are not directly related to damaged or moved reflectors on the LED screens.
Samsung LED TVs are not manufactured using any reflectors, so there is no need to be concerned about them causing white spots.
It’s worth mentioning that some Samsung TVs, like LG TVs, do use reflectors and may develop white spots if the reflectors move from their position.
However, these reflectors are responsible for the appearance of bright spots on LG screens, not Samsung screens. So, in the case of Samsung TVs, the main culprit behind bright spots is the reflectors inside the TV.
Understanding the Reason Behind Bright Spots on Samsung TV
The reflectors inside your Samsung TV play a crucial role in the visual display. They are designed to spread the light evenly across the screen rather than emitting it at a single point.
However, when these reflectors become loose and move away from their original location, they no longer function properly. As a result, all of the lights inside the television congregate at a single point, resulting in a bright spot on the screen. In other words, reflectors are the primary cause of bright spots on Samsung televisions.
Now that we have a better understanding of the problem let’s move on to the step-by-step solution to remove the bright spots on your Samsung TV.
Step-by-Step Guide: Removing Bright Spots on Your Samsung TV
Before we begin the step-by-step guide, it’s important to note that this process involves opening your TV. If you have prior experience opening TVs, you can proceed with caution.
However, if you’re unfamiliar with TV repairs, we highly recommend contacting an expert to ensure your safety and the integrity of your TV. If you choose to proceed on your own, please follow the safety measures outlined below:
Safety Measures:
- Wear appropriate footwear to prevent any accidents.
- Use gloves while working to protect your hands.
- Follow all instructions carefully for safe TV opening.
Now let’s dive into the step-by-step process:
Step 1: Gather the Required Items
To successfully repair the reflectors inside your TV, you’ll need the following items:
- Screwdrivers of various sizes
- Magnetizer and demagnetizers for the screwdrivers
- Prying tool
- Toothpick
- Gloves
- Superglue
Step 2: Unplug Your TV
Before you start the repair process, ensure your TV is turned off and unplugged from the power supply. Wait a few minutes to allow the capacitor to drain the remaining power, thus minimizing the risk of electric shock.
Step 3: Unscrew and Remove the Screws
Locate and unscrew all the screws at the back of your TV using the appropriate screwdriver. Using magnetized and demagnetized screwdrivers is recommended to make the unscrewing process easier.
Pay close attention to the placement of each screw according to its size, as different screws may have different sizes.
Step 4: Remove the Back Cover
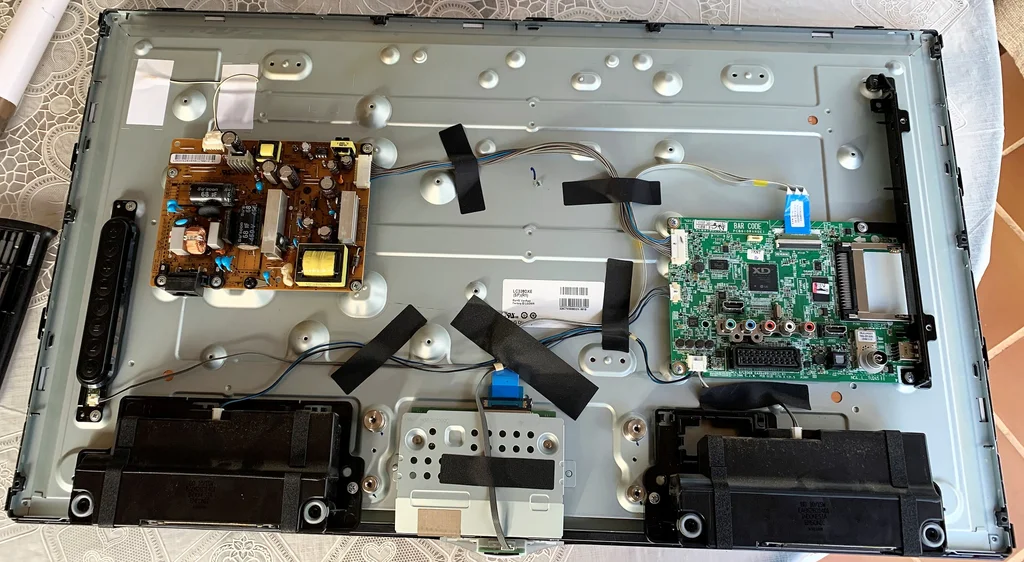
Once you’ve unscrewed all the screws, it’s time to remove the back cover of your TV screen.
You may need to use a prying tool to create a gap between the TV and its cover, making it easier to lift the cover.
Step 5: Flip Your TV
To facilitate the repair process, carefully place or flip your TV in a position where the back faces the ceiling.
Samsung TVs are lightweight and designed to prevent damage, so there’s no need to worry about the components.
Step 6: Remove Your TV Screen
Unscrew the edges of the screen to detach it from the TV. Use a pry tool to lift the frame of the screen.
Underneath the screen, you’ll find ribbon cables—carefully disconnect these cables from the screen.
Step 7: Lift the Diffuser Panel
After removing the cables, you’ll see a diffuser panel inside your TV. These panels diffuse the light from the reflectors. Lift the diffuser panel to gain access to the reflectors.
Step 8: Reglue the Reflectors
Directly beneath the diffuser panel, you’ll find the reflectors. Some lenses may have become loose and moved from their original position, causing the bright spots.
Your task is to regulate and reposition the reflectors in their correct locations carefully.
Step 9: Reassemble the TV
Once you’ve repositioned the reflectors, it’s time to assemble everything. Begin by placing the diffuser panel back in its original position and pressing it to lock it in place.
Step 10: Return the Screen and Cover
Proceed by reattaching the TV screen. Screw the screen and frame back into position, ensuring each screw is securely fastened. Finally, carefully screw the cover of the TV back in place.
Step 11: Test Your TV Screen
The final step is to plug in your TV, turn it on, and test the screen. If everything has been done correctly, the bright spots should no longer be present. However, if the bright spots persist or the screen doesn’t work, it’s advisable to seek assistance from an expert.
Conclusion
Bright spots on Samsung TVs can be quite bothersome, but with the right knowledge and guidance, you can solve this issue.
In this comprehensive guide, we have covered the causes of bright spots on your Samsung TV and detailed steps to remove them.
You can restore the visual quality of your Samsung TV and enjoy an optimal viewing experience by carefully following our step-by-step instructions and taking the necessary precautions.
If you’re having trouble or your TV is still under warranty, it’s best to contact the seller or manufacturer for help troubleshooting. When performing repairs or modifications to your electronic devices, always prioritize safety.
READ MORE: